Saturday, July 9, 2011

A Picnic in the Park: Inspiration

AAhh summer: Bike rides, beachin' it, bbq's, and, of course, picnics! I've always been a fan of stealing airline blankets for future picnic use and, well, 'tis the season! Below are some fun items that I've always enjoyed on a picnic and perhaps you will too! (From left to right, starting at the top)A Picnic in the Park


1) First of all, what's the point of loungin' in the sun if you have nothing to show for it afterwards! This MAUI BABE lotion is THE GREATEST! it can take you from "January Office Body" to "Bronzed Beauty" in a few short sun sessions. But remember, there's no sunscreen in it! So remember to load up on that first!!

2) one word: HAVAIANAS! I recently got to spend some time in Brazil and finally got what the big deal with these flop flops is. They may just be the most comfortable pair I've ever owned, and they come in every color as well as some awesome patters! Just Try on a pair and I bet you'll never buy another brand of flippy floppies ever again!

3) I dont understand why people limit board game adventures to the family living room. I say: BUST THAT SHIT OUT! and bring a game like scrabble or connect four along your next park outing. I was recently given this AWESOME travel scrabble game and it has served me well! The new game sets are waterproof and fold up ever so neatly so get one for yourself! and maybe one as a gift! You (and the gift recipient) won't be disappointed...

4) Plaid shirt: Picnic Chic... 'Nuff said.

5) A Crossword puzzle (this may not be for you, but I never leave the house without one... I encourage you to just give it a shot. I suggest a monday crossword for beginners, and I bet you'll be hooked in no time. Plus, studies show that exercising your brain every day with activities like crossword puzzles and other brain games can prevent mental deterioration. Here are a few words commonly found in crossword puzzles and their definition to get you started...
  • Aerie: High nest
  • Epee: Dueling sword
  • Nee: Formerly called, or precedes a maiden name
  • Poi: Polynesian food

6) Everything is better with music. Grab some portable speakers and create a soundtrack to your life! Here are a few tracks on MY soundtrack that really get my feet tappin'.
  • Got to Give it Up: Marvin Gaye
  • Steppin' Razor: Sublime
  • Down and Out in New York City: James Brown
  • Mais Que Nada: Sergio Mendes
  • He Got Game: Public Enemy
  • Hold Ya: Gyptian (the Billy Blue & Nicki Minaj as well as the Major Lazer remix are both great versions too!)
  • Beautiful: Damian Marley

7) Key necklace... nothin' special, just thought it went nicely with the outfit. I've got a necklace with keys that I've collected from some of my travels on it...I would, and probably have, worn it to the park.

8) Wayfarer sunglasses. Any so-cal resident will tell you these are a must. and now that EVERYONES knocking the ray-bans off, you can score a pair for $5 at places like Venice Beach and Swap Meets. Sweet Deal, sweeter look.

9) Jean shorts. Cause Daisy Duke aint the only gal who should be rockin these. Throw on a leather belt with bronze or antiqued looking buckle for a more polished look.

10) And last but CERTAINLY not least: The Quintessential Picnic Item: A WINE (and cheese) KIT! Trust me: once you've discovered collapsible plastic wine glasses you'll never go back to paper cups.. and c'mon.. face it...you're far too classy for a dixie cup!

***A little extra*** also, I recently stumbled across this ADORABLE modern take on a picnic basket. check it yo: MODERN PICNIC BOXES
Well, there you have it folks: A plethora of picnic paraphernalia! Hope this post gets you packing up for the park!
Enjoy!
-Sarah

Plaid blouse
$15 - delias.com

River Island black sunglasses
£5 - riverisland.com

Havaianas Mens Brasil Flip-Flops
$22 - piperlime.gap.com

Friday, July 8, 2011

Stripes Ahoy! Style & Inspiration

Thank goodness it's summer! And what's so fantastic about summer? (besides the BBQ's, beach trips and your excellent tan...) Getting to rock the nautical look of course!! I'm obsessed. I wait around all year till the weather is appropriate to sport the stripes and, BoNUS, it's a style thats popular year after year! So here's a little collection I threw together to inspire your own seafaring styles and nautical notions.
Bon Voyage!

Saturday, July 2, 2011

Making Something out of Nothing: Awesome AND Easy Napkin Rings for ANY occasion!

A while back I was having the fam. over for Easter... and it was my very first time hosting a holiday for them so, of course, I wanted to make it extra special! This meant table decorations, tablecloths, fabric napkins.... the usual... but it was still missing something... NAPKIN RINGS! Nothing makes a table look fancier than some napkin rings! But the guests were arriving in a few hours, certainly not enough time to make a target run to buy some...so what does a crafty gal do? She makes her own!
You really only need three things (plus some scissors):
  • A glue gun (or regular Elmers glue or fabric glue, but then you have to wait for it to dry )
  • An Empty toilet paper or paper towel roll
  • A scrap of Fabric (any kind... i used burlap cause its also what I used to make a table runner, and you don't need much.)
And heres how I did it....(you're essentially just wrapping the paper roll in fabric and glueing it in place... pretty simple! But just in case, here are some directions!)

Step 1:
Cut the paper roll into pieces that are 1/2 - 1 inch wide (depending on how thick you'd like the napkin ring to be.)

Step 2:
Cut out a strip of fabric twice the width of the paper roll and about 4 inches long
Step 3:
Center the paper roll on the fabric. At the end of the fabric strip, place a dot of glue and adhere the fabric to the paper roll.
Step 4:
Fold the fabric over the edge of the roll and glue in place. (you will be glueing the fabric to the inside of the roll)
Step 5:
Glue down the other end of the fabric so all ends are nice and flush with the roll.
and you're done! So easy! and, like i said, you can use ANY fabric! Maybe you need some last minute fourth of July themed napkin rings?
Be creative and enjoy!
Happy (almost) 4th!!

Friday, July 1, 2011

Terrific Terrariums! An Ecosystem in a Jar!


If you're anything like me, and enjoy flippin' through design magazines, I'm sure you've also noticed the sudden popularity of desktop terrariums... no, not the ones that house lizards and snakes... the ones with cute little plants inside! These guys are EASY to make and so fun to assemble to fit your (and your home's) style! Also, they're a thousand times easier to care for than a house plant. I went with succulents as my plant of choice, but there are many options.
(the following directions are for a succulent/cactus garden, but its all the same, all you need to do is swap out the cactus soil for regular indoor potting soil, and lose the sand)


You will need the following:
  • an awesome jar/container/apothecary jar/any other creative idea for a container! (as long as it's awesome) ;)
  • activated carbon (sold at fish/pet stores)
  • pea pebbles
  • cactus/palm soil
  • succulents (go for the super tiny ones...)
  • sand or gravel for the top (not necessary... but it makes it look "finished" if you ask me)
  • small brush, ( a paint or makeup brush should do the trick. )
  • and if you're feelin funky, possibly a tiny figurine to put in your tiny ecosystem! (Mine is a lil' man sitting on a log playing a guitar. Picked him up at a flea market in Brazil!) be creative! anything can work!


Step 2:
Clean and dry the glass container. Layer the bottom of the jar with 1 and 1/2 inches of pea pebbles. This provides good drainage for your little plant friends. "Learned the hard way" tip: WASH the pebbles first! You'll be surprised at just how dirty they are right out of the package and it will make your jar look the same.

Step 3:
Add a 1/2 inch layer of activated charcoal on top of the pebbles. This serves as a filter for the plants and will nix any odor or extra moisture.

Step 4:
Add a 1 inch layer of soil on top of the charcoal/pebble layers. Place your new plant friends in your desired arrangement and pull the soil back to plant em. Start with the smallest plants if you are planting multiple plants. Add enough additional soil to cover the plant's root system and fill the holes. After you've got em just where you want, even out the soil and press around the plants to insure they are snug as a bug in a rug in their new home!

Step 5:
Pour enough sand in to make a layer that completely covers the soil. (about 1/2 inch) then use that lil' brush to give your succulent leaves a nice cleanin'. Brush off all the extra sand and dirt and BAM! Terrarium project done!


Sunday, May 1, 2011

Love Punch


Strawberries are in season and I've been using them in everything from smoothies to salads! Here's one way to use strawberries to decorate and add a little flavor to your favorite juice, sparkling water, or other beverage.
To make the strawberries into hearts, cut the stem off by cutting two slits in the top at an angle, (i try to round mine like an arch to get more of that bubble heart look, but a simple straight line will do)


Align Right

then cut the strawberry in half and trip the sides to give it a sharp angle. (see photo below)


You can toss the strawberries in the pitcher just like that, or cut them into thinner slices. (I like the keep them in the halves because strawberries will absorb some of the water and get a little mushy if sliced too thin)

Awww... look how cute that is! Yay! I <3 strawberries!

Monday, February 15, 2010

Re-vamped Hanging Letter Organizer

Another renewal!


Here’s my most recent “renew”.... a hanging letter organizer that i found broken at a garage sale and believe I bought for $1.

** Tip: When hunting at garage sales or thrift stores for items to restore, ignore the color or any finishes on them! look for pieces that come apart for easy painting and reassembling! Remember, youre gonna sand and repaint everything and all you really need is a good skeleton...


Before.....


After!!!!!


To Renew this letter organizer, i took the backing off (it was just staple gunned in, as backing usually are..) lightly sanded it, primed it, and spray painted it white. Then I used scrap fabric to wrap the backing, stapled it back on, and voila! a new crisp white letter organizer with a little lime-green, mod flair!!


(also-these letter organizers a EASY to find at any goodwill and re-finishing one is a fun, quick DIY decorating project!)


Delicious AND nutritious! but best of all- quick and EASY!

So its a new year, and with that comes New Year’s resolutions.. and from what i’ve heard, “Getting fit for summer” is on almost everyones list (including mine!) so i thought i’d share some AWESOME low calorie/high taste recipes that are super quick, super easy, and SUPER DUPER yummy!


ps... by substituting simple ingredients like turkey bacon instead of regular bacon, you can still enjoy some of your favorites without the added gross stuff (fats... sodium.. carbs... sugars... trans fats... gross..)


Well Balanced Day-Starters!

Mc-Healthy Egg Sandwich

  • 1 egg white
  • 1/4 cup torn spinach
  • 1 slice reduced fat/low fat cheese of choice (I like parmesan cheese, grated and thrown in while the egg is cooking, but a slice of cheese works too..)
  • 1 slice Canadian bacon (which is suprisingly good for you... a little high in sodium, but waaay better than sausage would be...)
  • salt and pepper (to taste)
  • 1 whole wheat english muffin


In a small bowl, mix egg, spinach, and salt and pepper.

Cook the egg in a small frying pan on the stovetop (or you can spray a small microwave safe bowl with a little non stick spray and microwave it for approx 1min 30sec.)

Heat canadian bacon in frying pan, or in toaster oven...

Toast english muffin and when done, arrange the egg (with the spinach cook in), canadian bacon and cheese in between and enjoy!


BEST healthy french toast EVER! (2servings)

  • 2 Slices whole wheat whole grain bread (something high in fiber-or whatever bread you want, but again- we’re trying to be healthy here!!)
  • 1 lg Egg
  • 1/4 cup non-fat vanillla creamer (the kind for your coffee!, i recommend the trader joes variety..but i recommend the trader joes variety of everything..)
  • 1 tsp cinnamon
  • 1 tsp vanilla extract
  • 1/2 cup fresh strawberries (or berry of your choice! bananas are also a great topping!
  • butter (or non-stick spray for pan)
  • Powdered sugar or honey (to taste)
  • dollop of plain or vanilla yogurt (optional)


in a bowl big enough to hold a slice of bread, beat the egg, creamer, cinnamon, and vanilla extract together.

place 1 slice of bread in and let soak for approx. 30 seconds on each side or until bread is well-coated.

In a frying pan or on a griddle, cook the french toast on each side until golden brown and egg is cooked.

Cut up strawberries and arrange on top of french toast. Sprinkle a small amount of powdered sugar on top or drizzle a little honey for some added sweetness.. but i like it plain, with a little plain or vanilla yogurt on the side.


Mid-Day Munchies aka LUNCH!

Indian Spiced Chicken Pita (2servings)

  • I boneless skinless chicken breast
  • 1/2 teaspoons garam masala
  • 1/2 teaspoon salt, divided
  • 1/4 cup thinly sliced seeded cucumber
  • 1/4 cup nonfat plain yogurt
  • 1tsp chopped fresh cilantro , or mint
  • 2-3 slices lemon (or 1 tbsp lemon juice
  • Freshly ground pepper (to taste)
  • 2 inch whole-wheat pitas, warmed
  • 1 cup shredded romaine lettuce
  • 1 roma tomato, sliced
  • about 1/4 of an onion -thinly sliced
-Sprinkle chicken with 1 teaspoon garam masala and 1/2 teaspoon salt. Cook chicken until pink in the center in a grill, in a frying pan, or (my favorite) on a George Forman grill! ( i got mine for $6 at the goodwill!)

-Transfer the chicken to a clean cutting board and let rest for 5 minutes.

-Meanwhile, combine cucumber, yogurt, cilantro (or mint), lemon juice, the remaining garam masala and salt and pepper in a small bowl.

-Thinly slice the chicken.

-Split open the warm pitas and fill with the chicken, yogurt sauce, lettuce, tomato and onion.


Yummy Spring Spinach salad with Cranberries and Apple

  • 1 handful spinach
  • 1 handful Lettuce (your choice, but remember, the darker the leaf, the more nutritional.. iceberg... may as well be cardboard..)
  • 1-2 strips of turkey bacon, cut up super tiny (or 1/2 tbsp bacon bits)
  • 1/2 granny apple diced (or other light colored apple)
  • 1/8 cup red onion very thinly sliced
  • crumbled bleu cheese (to taste)
  • 1/8 cup dried cranberries
  • Walnuts (halved or whole- to taste)
  • gorgonzola, raspberry vinaigrette, or dressing of your choice. ( i LOVE the champagne pear gorgonzola dressing from Trader Joes)

In Large bowl, toss together all ingredients and serve immediately. (salad gets soggy remember!) if you’re taking this to work or preparing it ahead, just wait to add the dressing until right before you’re ready to eat!


Delicious Dinners!


Its not delivery-Its a healthy veggie pizza!

  • pizza crust/dough (i like the garlic and herb dough from Trader Joes..)
  • 1/2 c pizza or pasta sauce
  • 1/4 c artichoke hearts (canned/drained or frozen/defrosted)
  • 1/3 c mozzarella cheese (skim)
  • onions (sliced thin)
  • spinach (torn)
  • 1/4 green bell pepper sliced lengthwise
  • tomatoes (reg or sundried, sliced)
  • lemon pepper
  • red pepper flakes


roll out dough, spread sauce on evenly, sprinkle with cheese and arrange veggies on top as desired. Season with a dash of lemon pepper and red pepper flakes before baking. Cook as crust directs for 1/2 time on pizza pan and 1/2 time on oven rack.


Sunday, January 3, 2010

A New Nest

Finally! My very own “nest”! That’s right folks! I got my own place! and boy-oh-boy, am IIIIII lovin’ it! Best part, of course, is getting to decorate!! I have sooo many projects planned so stay tuned! I was feeling a little under the weather today, so I decided to keep the running around town to a minimum, but tomorrow I plan on re-caulking the bathroom tub! a project that’s actually fairly easy to do yourself, but makes a huuuge difference and really gives your bathroom a fresh, clean look! (of course, i’ve never done this before, but i have done my research and watched a youtube video or two... so we’ll se how it goes... wish me luck!)


Its my first week at my place, and so far all ive been doing is trying to fill it with furniture. Since im always trying to be thrifty, and am a huge fan of recycling goods, I’ve been scouring craigslist looking for deals on decor to fill my humble abode. I must say, Ive been VEEERY successful!

So far I have scored some awesome deals! And im pretty sure ive furnished my whole place for just around $100! Here’s how:

One Saturday, I was garage sale shopping and i found a BRAND NEW Ikea coffee table that retails for about $180. It was the end of the day, and i talked the guy into giving it to me for $5! Then i listed it on craigslist for $80 and INSTANTLY got a taker. Soo... I made $75... THEN I found these AWESOME bubblegum pink chairs on craigslist for $15... and bought two... kept one, and listed one on craigslist for $50... and INSTANTLY got a taker... (who, by the way, was an antique dealer who told me he was reselling it for $125!!! ...i shoulda gone higher... damn..)Soo.. since I spent $30 on the chairs, but sold em for $50.. so I made $20...Now I have a living room chair, and $95 in my pocket.... Soooo I bought this great brand new coffee table for $100. By using what i’ve made so far, I’ve only spent $5 out of pocket. Then I came across these chairs.. which are PERFECT for the modern look im going for... and they were $40 for both... so far.. $45 spent.. then I found a Ikea couch in great condition for $50. I still have to spend a little to have it clean but thats a grand total of a mere $95 dollars spent and I’ve furnished almost the whole place! Now all i need to find is a dining table that is bar height and matches the chairs, and I’m done furnishing...

of course then theres all the decorating and finishing touches..

Wednesday, December 9, 2009

Tuesday, December 8, 2009

a MUST share! : www.save-on-crafts.com!

seeing as Im'm a lover of all things discounted, this site has quickly become one of my new favorites. The craft items and decorating supplies on this website are not only affordable, (better than affordable....down right insane!) but they also carry many hard-to-find items, such as birch paper, antique birdcages (that start at about $20!) and a wide range of apothecary jars.

here are a few of my favorites straight from their site!
Enjoy!


Thursday, December 3, 2009

Fun Gifts for Him for Under $50!

As much as a love tearing through wrapping paper myself, one of my favorite parts of the Holidays is gift giving. But who knows what to get anyone these days?! And lets face it, the monogramed flask has been done, and no one needs another new bathrobe for the 4th year in a row... so how bout some fresh gift ideas, (and a few classics..) for that hard-to-shop-for gentleman on your list?


(top row from left)
1. SuperHeadz Plamodel DIY 35mm Camera $35! A DIY camera that lets you not only take the photos- but build the camera too!
2. Freaks and Geeks the Complete Collection $36! Seriously, its the best show ever.. Relive every high school swirlie and akward first dance with this awesome box set!
3. Ticket Stub Diary $12 OK so scrap booking may be Über girlie, but the gents still wanna save the memories of the Yankees taking another world series! This album is designed to document your favorite games, concerts and events... in the most masculine way possible.
(middle items)
4. Recycled Skateboard Cufflinks $20 Get him a gift even Tony Hawk would be jealous of! These one of a kind cufflinks are crafted from the wood of old skateboard decks. Each one is unique and it makes a great gift for your extreme sports dude.
5. Collapsible Trunk Organizer with Cooler $32 Its no secret that I'm a sucker for all things organization... so any chance i have to pass my OCD tendencies on to someone, I take. Plus, no gal likes a guy with junk in the trunk! am i right?!
(bottom row)
6. Jack Black Men's First Class Five Grooming Kit $48 One of the best in mens skin care, this airport security friendly kit has everything you need to keep guys skin smooth!
7. Cardboard Animal Head $28 Its a cardboard animal head! it pretty much sells itself.... Oh- and did I mention it comes in Bison too?
8. Double Horsepower SYMA Dragonfly Remote Controlled Helicopter $46 I don't care what any of you men say... you're all 10 year old boys at heart... and there isn't a-one of ya who wouldn't spend hours playing with a remote controlled anything any day of the week...
9. LEGO® Architecture: Empire State Building Set $24 Following the same rules as remote controlled toys, are Legos... Just TRY to not play with em if they're in front of you! and with Lego's new Architecture line, you can have all the fun and not feel like a total nerd stuck building the Death Star, or Temple of Doom ,or whatever...


Well.. I hope that gives you a few ideas... the websites I found these items on are great as well! (especially uncommongoods.com ) And remember : NO ONE UNDER 92 YEARS OF AGE LIKES FRUITCAKE!

To all The Holiday Jet-Setters and Globe-Trotters... and those just going over the river and through the woods to Granny's..


The Holidays are here people! And chances are good, with that comes traveling to see family! ( ...or traveling to escape ‘em) Either way, i thought I’d share with you a few tips and tricks for smooth sailing!

Tip #1... Pack light!

I used to want “options”... then I realized I only ever wear about half the clothes I brought... and what a waste of packing space that is!


The easiest way to maximize your outfits is to bring items that are “cross-over” pieces... or items that (with a little tweaking) can go from a day look to a night look....

I LOVE my grey sweater dress and heres how, with a few added accessories, it goes from a comfy day look to a swanky night-out-on-the-town ensemble!


Tip #2 Rock and “ROLL”!!

ok ok... maybe rockin’ isnt in line with my traveling tips, but ROLLING your clothes when packing sure is!! This helps to keep clothes wrinkle-free and gives you TONS more room than just folding (or stuffing) your clothes into your bag would.


cherry on top: if you wanna get fancy, you can roll your clothes in tissue paper.. this help to keep clothes extra extra wrinkle free!


Tip #3... Packing Cubes!!!

Allow me to introduce you to what may be the greatest invention in packing since the rolling suitcase... PACKING CUBES!!! GET YOURS HERE AT AMAZON.COM!!


After my dear friend Audrey raved about these packing aides, I had to get one for myself and boy-oh-boy i don’t know how I ever travelled without ‘em!!

These mesh bags are the secret to packing organization! Instead of unpacking everything to find what your looking for, all you have to do is grab the cube, take out what you want, zip it and toss it back in your bag. No more digging around or unpacking everything just to find that one thing you need!


Take a look at how the double-sided packing cube condensed a whopping 23 items that spread out over my whole bed into a cube just barely bigger than a shoe box!!


2 pants

3 dresses

1 jacket

2 pairs of leggings

1 vest

3 undershirts

1 blazer

2 sweaters

5 shirts

2 belts

1 skirt

all fits in this:


im telling you... im amazed every time!!


Tip #4 Check in Online!!

I’m sure you’ve heard this one before.. but I’ll reiterate... Airlines allow you to check in online and print your boarding pass from home. Also, now you can have your boarding pass sent to your cell or PDA and, from that, they can simply scan the barcode on your screen!


Tip #5 Cover your Ass!!!

Recently, on a trip to NYC I had my entire purse stolen, and with that went my wallet, cell phone, ID, credit cards, (and even my Ipod... ) boo....

Needless to say, I learned a couple of lessons the hard way! I learned that you dont necessarily need your ID when you travel (THIS IS NO EXCUSE TO TRAVEL W/OUT ONE!...Just advice for what to do if one gets lost!)

Make photo copies of your ID and passport and keep them hidden in your suitcase just in case. I also recommend bringing 2 credit cards/atm cards and keeping each in a different bag or wallet.

One day this just may save you a whole lotta time/money and DEFINITELY the headache.


Other than that..bon voyage!

Oh... and to expunge any possible feelings of guilt, it IS, according to me and any person who’s ever flown on a plane ever, OK to steal the blankets... I take em any chance I get... WASH em when you get home of course, but they make for wonderful picnic blankets-- and lets face it- now some airlines have to audacity to charge for pillows and blankets...RUDE!! “I’m sorry, but I was under the impression that my $523 ticket included my comfort... oh it doesn’t? I see..so I have to pay an additional fee to be warm and comfortably cushioned...i. i get it... tooootally fair...”

BAH! take the blankets! take em all!!


Sunday, October 25, 2009

Organize drawers in a snap!

So i was cruzin the 99 cent sore and came across these chip/dip serving trays. They're the perfect shape and the different sized compartments are ideal for storing loose junk and tidying up that always-messy drawer.

the 99 cent store has a BUNCH of containers and other organizational aids that are (duh) only 99 cents and, if youd like, could easily be painted or decoupaged to suit your decorating desires!

my mother always said... "messy bed-messy head..." (before)...
The calming effect that an organized drawer has ones mind is nothing short of amazing....(after!)....

Wednesday, October 21, 2009

Before and After: Mid-Century Modern nightstand from the Goodwill!

Here's another one for you folks!

I found this Mid-century Modern (thats "Mad Men" style for the fans out there...)nightstand at the Goodwill and it was missing a tag! (my favorite!) The manager gave it to me for $11.00!! What a steal!
Of course... it was in horrible condition... chipping paint... no hardware... It needed some TLC...
But for $11 how could i resist!?

I stripped it and sanded it down then primed it-painted it extra glossy black then handpainted the inside a Caribbean blue/turquoise color.
BUT THATS NOT ALL FOLKS!
my favorite feature... (drum roll please.....)
The fabric lined drawers!!!
Cute huh!
Then i added the handle. It came from a dresser that I am also refinishing and wanted to give a more modern look to. (so no need for these vintage looking handles!!.. but perfect for our nightstand!)

and thats that! a "brand new" mid-century modern nightstand with a vintage twist...
and a great addition to my bedroom!


Tuesday, October 20, 2009

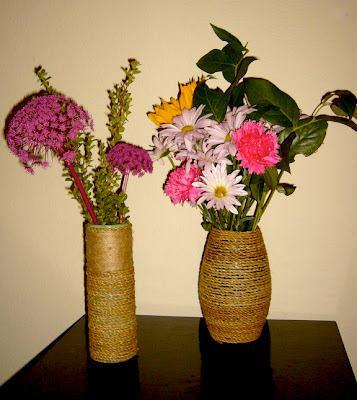
Designer Duplication: Rattan Vase!

Well, now that you have some beautiful flowers (flower/pens that its..), you're gonna need a stunning vase to put them in! So why not get the designer look for a discount!!?

Natural elements and materials are a great way to give any room a warm, earthy feel and bring the outdoors in. Fall is the perfect time to experiment with different natural materials like moss, sticks and leaves... and even some twine! (like we'll do in this project!)

Right now, Crate and Barrel are selling these Rattan vases for $64.95....

Here is how to make yours for around $3.00!!! (thats a pretty hard-core discount my friends!!):


You'll need the following ingredients:

  • twine or natural braided rope (available at any hardware store... but i got mine at the .99 cent store!)
  • scissors
  • a vase (again- got mine at the .99 cent store!!) or any item that can hold flowers...even a large plastic cup will work!
  • glue gun

now assuming you have a glue gun already, you can see how inexpensive this project really is!

alright: instruction time!

First, starting at the bottom, attach the twine to the vase using a small dot of glue and begin wrapping it around.
You dont need to glue all the way around. A pea-sized amount about every inch or so should suffice.

Its really that easy! ... just wrap it all the way up!
I chose to use two different kinds of twine and used both on the skinnier vase. Get creative! you can mix ribbon or different textures to create a unique and custom look to go with any room!
And Voila~ a designer look for a discount AND something you made that you can be proud of!
Enjoy!

And here are the SAME vases featured in this months "Real Simple" magazine! See! they're super "in" and now they can be all yours!!!


(photos courtesy of Real Simple Magazine)