Bon Voyage!
Showing posts with label Designer duplicate. Show all posts
Showing posts with label Designer duplicate. Show all posts
Friday, July 8, 2011
Stripes Ahoy! Style & Inspiration
Thank goodness it's summer! And what's so fantastic about summer? (besides the BBQ's, beach trips and your excellent tan...) Getting to rock the nautical look of course!! I'm obsessed. I wait around all year till the weather is appropriate to sport the stripes and, BoNUS, it's a style thats popular year after year! So here's a little collection I threw together to inspire your own seafaring styles and nautical notions.
Friday, July 1, 2011
Terrific Terrariums! An Ecosystem in a Jar!

(the following directions are for a succulent/cactus garden, but its all the same, all you need to do is swap out the cactus soil for regular indoor potting soil, and lose the sand)
You will need the following:
- an awesome jar/container/apothecary jar/any other creative idea for a container! (as long as it's awesome) ;)
- activated carbon (sold at fish/pet stores)
- pea pebbles
- cactus/palm soil
- succulents (go for the super tiny ones...)
- sand or gravel for the top (not necessary... but it makes it look "finished" if you ask me)
- small brush, ( a paint or makeup brush should do the trick. )
- and if you're feelin funky, possibly a tiny figurine to put in your tiny ecosystem! (Mine is a lil' man sitting on a log playing a guitar. Picked him up at a flea market in Brazil!) be creative! anything can work!

Step 2:
Clean and dry the glass container. Layer the bottom of the jar with 1 and 1/2 inches of pea pebbles. This provides good drainage for your little plant friends. "Learned the hard way" tip: WASH the pebbles first! You'll be surprised at just how dirty they are right out of the package and it will make your jar look the same.
Step 3:
Add a 1/2 inch layer of activated charcoal on top of the pebbles. This serves as a filter for the plants and will nix any odor or extra moisture.

Step 4:
Add a 1 inch layer of soil on top of the charcoal/pebble layers. Place your new plant friends in your desired arrangement and pull the soil back to plant em. Start with the smallest plants if you are planting multiple plants. Add enough additional soil to cover the plant's root system and fill the holes. After you've got em just where you want, even out the soil and press around the plants to insure they are snug as a bug in a rug in their new home!

Step 5:
Pour enough sand in to make a layer that completely covers the soil. (about 1/2 inch) then use that lil' brush to give your succulent leaves a nice cleanin'. Brush off all the extra sand and dirt and BAM! Terrarium project done!
Labels:
crafts,
Designer duplicate,
DIY,
home decorating
Tuesday, October 20, 2009
Designer Duplication: Rattan Vase!

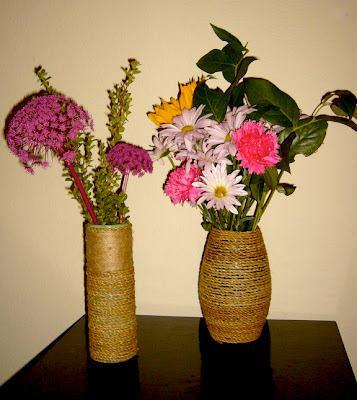
Well, now that you have some beautiful flowers (flower/pens that its..), you're gonna need a stunning vase to put them in! So why not get the designer look for a discount!!?
Natural elements and materials are a great way to give any room a warm, earthy feel and bring the outdoors in. Fall is the perfect time to experiment with different natural materials like moss, sticks and leaves... and even some twine! (like we'll do in this project!)
Right now, Crate and Barrel are selling these Rattan vases for $64.95....
Here is how to make yours for around $3.00!!! (thats a pretty hard-core discount my friends!!):
You'll need the following ingredients:
- twine or natural braided rope (available at any hardware store... but i got mine at the .99 cent store!)
- scissors
- a vase (again- got mine at the .99 cent store!!) or any item that can hold flowers...even a large plastic cup will work!
- glue gun
now assuming you have a glue gun already, you can see how inexpensive this project really is!
alright: instruction time!
First, starting at the bottom, attach the twine to the vase using a small dot of glue and begin wrapping it around.

You dont need to glue all the way around. A pea-sized amount about every inch or so should suffice.
Its really that easy! ... just wrap it all the way up!

I chose to use two different kinds of twine and used both on the skinnier vase. Get creative! you can mix ribbon or different textures to create a unique and custom look to go with any room!
And Voila~ a designer look for a discount AND something you made that you can be proud of!
Enjoy!
And here are the SAME vases featured in this months "Real Simple" magazine! See! they're super "in" and now they can be all yours!!!
(photos courtesy of Real Simple Magazine)
Labels:
bargain,
Designer duplicate,
DIY,
fall,
home decorating
Subscribe to:
Posts (Atom)


