Check this out and vote for my friend! (plus its a great blog too!!)
Wednesday, December 9, 2009
Big Shot Artist in the Spotlight: BrickFish is doing the most
Tuesday, December 8, 2009
a MUST share! : www.save-on-crafts.com!
seeing as Im'm a lover of all things discounted, this site has quickly become one of my new favorites. The craft items and decorating supplies on this website are not only affordable, (better than affordable....down right insane!) but they also carry many hard-to-find items, such as birch paper, antique birdcages (that start at about $20!) and a wide range of apothecary jars.


here are a few of my favorites straight from their site!
Enjoy!
Thursday, December 3, 2009
Fun Gifts for Him for Under $50!
As much as a love tearing through wrapping paper myself, one of my favorite parts of the Holidays is gift giving. But who knows what to get anyone these days?! And lets face it, the monogramed flask has been done, and no one needs another new bathrobe for the 4th year in a row... so how bout some fresh gift ideas, (and a few classics..) for that hard-to-shop-for gentleman on your list?

(top row from left)
1. SuperHeadz Plamodel DIY 35mm Camera $35! A DIY camera that lets you not only take the photos- but build the camera too!
2. Freaks and Geeks the Complete Collection $36! Seriously, its the best show ever.. Relive every high school swirlie and akward first dance with this awesome box set!
3. Ticket Stub Diary $12 OK so scrap booking may be Über girlie, but the gents still wanna save the memories of the Yankees taking another world series! This album is designed to document your favorite games, concerts and events... in the most masculine way possible.
(middle items)
4. Recycled Skateboard Cufflinks $20 Get him a gift even Tony Hawk would be jealous of! These one of a kind cufflinks are crafted from the wood of old skateboard decks. Each one is unique and it makes a great gift for your extreme sports dude.
5. Collapsible Trunk Organizer with Cooler $32 Its no secret that I'm a sucker for all things organization... so any chance i have to pass my OCD tendencies on to someone, I take. Plus, no gal likes a guy with junk in the trunk! am i right?!
(bottom row)
6. Jack Black Men's First Class Five Grooming Kit $48 One of the best in mens skin care, this airport security friendly kit has everything you need to keep guys skin smooth!
7. Cardboard Animal Head $28 Its a cardboard animal head! it pretty much sells itself.... Oh- and did I mention it comes in Bison too?
8. Double Horsepower SYMA Dragonfly Remote Controlled Helicopter $46 I don't care what any of you men say... you're all 10 year old boys at heart... and there isn't a-one of ya who wouldn't spend hours playing with a remote controlled anything any day of the week...
9. LEGO® Architecture: Empire State Building Set $24 Following the same rules as remote controlled toys, are Legos... Just TRY to not play with em if they're in front of you! and with Lego's new Architecture line, you can have all the fun and not feel like a total nerd stuck building the Death Star, or Temple of Doom ,or whatever...
Well.. I hope that gives you a few ideas... the websites I found these items on are great as well! (especially uncommongoods.com ) And remember : NO ONE UNDER 92 YEARS OF AGE LIKES FRUITCAKE!
To all The Holiday Jet-Setters and Globe-Trotters... and those just going over the river and through the woods to Granny's..
The Holidays are here people! And chances are good, with that comes traveling to see family! ( ...or traveling to escape ‘em) Either way, i thought I’d share with you a few tips and tricks for smooth sailing!
Tip #1... Pack light!
I used to want “options”... then I realized I only ever wear about half the clothes I brought... and what a waste of packing space that is!
The easiest way to maximize your outfits is to bring items that are “cross-over” pieces... or items that (with a little tweaking) can go from a day look to a night look....
I LOVE my grey sweater dress and heres how, with a few added accessories, it goes from a comfy day look to a swanky night-out-on-the-town ensemble!

Tip #2 Rock and “ROLL”!!
ok ok... maybe rockin’ isnt in line with my traveling tips, but ROLLING your clothes when packing sure is!! This helps to keep clothes wrinkle-free and gives you TONS more room than just folding (or stuffing) your clothes into your bag would.
cherry on top: if you wanna get fancy, you can roll your clothes in tissue paper.. this help to keep clothes extra extra wrinkle free!
Tip #3... Packing Cubes!!!
Allow me to introduce you to what may be the greatest invention in packing since the rolling suitcase... PACKING CUBES!!! GET YOURS HERE AT AMAZON.COM!!
After my dear friend Audrey raved about these packing aides, I had to get one for myself and boy-oh-boy i don’t know how I ever travelled without ‘em!!
These mesh bags are the secret to packing organization! Instead of unpacking everything to find what your looking for, all you have to do is grab the cube, take out what you want, zip it and toss it back in your bag. No more digging around or unpacking everything just to find that one thing you need!
Take a look at how the double-sided packing cube condensed a whopping 23 items that spread out over my whole bed into a cube just barely bigger than a shoe box!!
2 pants
3 dresses
1 jacket
2 pairs of leggings
1 vest
3 undershirts
1 blazer
2 sweaters
5 shirts
2 belts
1 skirt
all fits in this:
im telling you... im amazed every time!!
Tip #4 Check in Online!!
I’m sure you’ve heard this one before.. but I’ll reiterate... Airlines allow you to check in online and print your boarding pass from home. Also, now you can have your boarding pass sent to your cell or PDA and, from that, they can simply scan the barcode on your screen!
Tip #5 Cover your Ass!!!
Recently, on a trip to NYC I had my entire purse stolen, and with that went my wallet, cell phone, ID, credit cards, (and even my Ipod... ) boo....
Needless to say, I learned a couple of lessons the hard way! I learned that you dont necessarily need your ID when you travel (THIS IS NO EXCUSE TO TRAVEL W/OUT ONE!...Just advice for what to do if one gets lost!)
Make photo copies of your ID and passport and keep them hidden in your suitcase just in case. I also recommend bringing 2 credit cards/atm cards and keeping each in a different bag or wallet.
One day this just may save you a whole lotta time/money and DEFINITELY the headache.
Other than that..bon voyage!
Oh... and to expunge any possible feelings of guilt, it IS, according to me and any person who’s ever flown on a plane ever, OK to steal the blankets... I take em any chance I get... WASH em when you get home of course, but they make for wonderful picnic blankets-- and lets face it- now some airlines have to audacity to charge for pillows and blankets...RUDE!! “I’m sorry, but I was under the impression that my $523 ticket included my comfort... oh it doesn’t? I see..so I have to pay an additional fee to be warm and comfortably cushioned...i. i get it... tooootally fair...”
BAH! take the blankets! take em all!!
Sunday, October 25, 2009
Organize drawers in a snap!
So i was cruzin the 99 cent sore and came across these chip/dip serving trays. They're the perfect shape and the different sized compartments are ideal for storing loose junk and tidying up that always-messy drawer.
the 99 cent store has a BUNCH of containers and other organizational aids that are (duh) only 99 cents and, if youd like, could easily be painted or decoupaged to suit your decorating desires!
my mother always said... "messy bed-messy head..." (before)...

The calming effect that an organized drawer has ones mind is nothing short of amazing....(after!)....

Wednesday, October 21, 2009
Before and After: Mid-Century Modern nightstand from the Goodwill!
Here's another one for you folks!
I found this Mid-century Modern (thats "Mad Men" style for the fans out there...)nightstand at the Goodwill and it was missing a tag! (my favorite!) The manager gave it to me for $11.00!! What a steal!

Of course... it was in horrible condition... chipping paint... no hardware... It needed some TLC...
But for $11 how could i resist!?
I stripped it and sanded it down then primed it-painted it extra glossy black then handpainted the inside a Caribbean blue/turquoise color.

BUT THATS NOT ALL FOLKS!
my favorite feature... (drum roll please.....)
The fabric lined drawers!!!
Cute huh!

Then i added the handle. It came from a dresser that I am also refinishing and wanted to give a more modern look to. (so no need for these vintage looking handles!!.. but perfect for our nightstand!)
and thats that! a "brand new" mid-century modern nightstand with a vintage twist...
and a great addition to my bedroom!

Tuesday, October 20, 2009
Designer Duplication: Rattan Vase!

Well, now that you have some beautiful flowers (flower/pens that its..), you're gonna need a stunning vase to put them in! So why not get the designer look for a discount!!?
Natural elements and materials are a great way to give any room a warm, earthy feel and bring the outdoors in. Fall is the perfect time to experiment with different natural materials like moss, sticks and leaves... and even some twine! (like we'll do in this project!)
Right now, Crate and Barrel are selling these Rattan vases for $64.95....

Here is how to make yours for around $3.00!!! (thats a pretty hard-core discount my friends!!):

You'll need the following ingredients:

- twine or natural braided rope (available at any hardware store... but i got mine at the .99 cent store!)
- scissors
- a vase (again- got mine at the .99 cent store!!) or any item that can hold flowers...even a large plastic cup will work!
- glue gun
now assuming you have a glue gun already, you can see how inexpensive this project really is!
alright: instruction time!
First, starting at the bottom, attach the twine to the vase using a small dot of glue and begin wrapping it around.

You dont need to glue all the way around. A pea-sized amount about every inch or so should suffice.

Its really that easy! ... just wrap it all the way up!
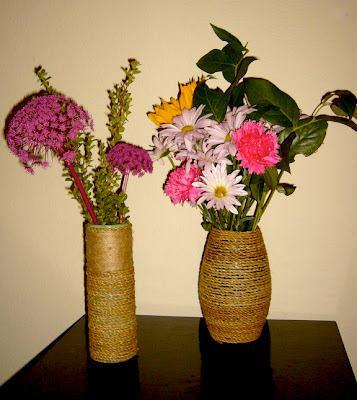
I chose to use two different kinds of twine and used both on the skinnier vase. Get creative! you can mix ribbon or different textures to create a unique and custom look to go with any room!
And Voila~ a designer look for a discount AND something you made that you can be proud of!
Enjoy!
And here are the SAME vases featured in this months "Real Simple" magazine! See! they're super "in" and now they can be all yours!!!

(photos courtesy of Real Simple Magazine)
Sunday, October 18, 2009
A Bouquet With a Purpose!!

So I was in the bookstore.. flipping through craft books for inspiration, when I came across these simple flower pens. Im sure we've all seen them somewhere before... you know.. the pen with a big silk flower on the end?... well.. I just happen to be in the market for some tabletop decorations and thought, why not a BUNCH of flower pens... in a vase... like a bouquet! Now im not usually a fan of silk flowers but if you're like me, and one of those people who cant ever find a pen when you really need one.. this is little project is perfect! just TRY to misplace these writing utensils now! :)
Below is the (SUPER EASY) DIY guide to making your own!
All it takes is:
- A vase
- 3 or more silk flowers (the kind with the metal running through the stem..)
- florist tape
- a ball-point pen for each flower
- scissors

First, cut your flowers to your desired length (remember, you're gonna attach the pen, so make them about 1-2 inches shorter to compensate)

Next, position the flower next to the pen so about 2/3 are overlapping. Wrap with the florist tape nice and tight.

Last- stick em in your vase!I added a few decoative leafy branches for a more "natural" look.. and Voila! a Bouquet thats both beautiful and functional!


Enjoy! and never lose a pen again!!
~Sarah
Before and After: Wall cabinet from the Goodwill
Just the other week i picked up this piece here for a whoppin' $4.99.....

I was super inspired by this photo here that i found on design*sponge in their before and after section (a GREAT place for inspiration..)

So I went to work....
- First I removed all the hardware and took the backing off.
- Then I sanded it down- a super important step in any refinishing project...
- Once sanded, I simply spray painted the whole thing- remembering to tape off the glass so it would stay nice while i painted
After about 3 coats it was all set.
While drying, I moved on to the back.
I knew I wanted a stencil look, but i wanted to keep the natural wood showing though- so a traditional stencil wouldnt work.
- Instead, I used stickers and tape to make the retro-style image i wanted on the back.**
**Learned it the hard way lesson** next time- CONTACT PAPER! (the stuff you line drawers with). the stickers didnt wanna say and the tape took FOREVER to cut into the shape i wanted!!
- After laying all my pieces just right and making sure everything was on there nice and smooth, i spray painted over the whole thing with a cheery buttercup yellow.**
**Learned the hard was lesson** ALWAYS prime first.... i literally went through an entire can of spraypaint on an area that was no more that 12x24 inches... and it didnt stick to the wood well- it was bad... thank god the lacquer sealer i finished it off with evened everything out!
- Once it was all dry (i know-its SOOO tempting to do it early... but wait!) i peeled off the stickers leaving the original wood showing through and sprayed the whole piece with a clear lacquer.
- After the back was completely dry, I staple gunned it back on the cabinet, re-attached the hardware and ...
voila! new cabinet!
I just love it.. and for about $8 (between materials and the cabinet itself) you just cant beat it!

of course now im thinking i want to make it white instead of black... oh the never ending color choice dilemma...
anyways.... hope this inspires you to visit your local 2nd hand store cause its like they say: one mans trash is another gals retro-revamped curio cabinet!
So to summarize:

Saturday, October 17, 2009
A hint of Lavender as you drift to sleep...
I almost forgot one of the best parts of making your own pillows!-- The opportunity to add a little scented sachet bag before you seal up your seam!!I chose Lavender for the pillows on my bed. And boy oh boy is it a relaxing aroma!
Below are a few aromatherapy basics
(according to www.aromanaturals.net) that might help you narrow down your options when faced with the difficult "what scent do i choose" dilemma...

Lavender- especially good at calming the nervous system, relaxing the body and enabling blissful sleep.
Chamomile- Used in aromatherapy, it is at its best helping with those who suffer from insomnia.
Bergamot- does its job by relieving stress and enabling relaxation. Gives a sense of well-being.
Sandalwood- a calming agent; it relieves nervous tension and helps you relax.
Peppermint/Spearmint- used in stress reduction and meditation and can help energize and improve clarity in thinking.
Eucalyptus- can be used to alleviate symptoms of the common cold and help with breathing.
Vanilla-Scientific studies have shown that this aroma brings to mind positive and happy memories.
Enjoy! and take some clarifying breaths with your new aromatherapy (super adorable and affordable) pillows!!
Friday, October 16, 2009
Making Something out of Nothing: Scrap fabric into a dog bandana
 Meet Gadget
yeah- i know.. its just ridiculous how cute that little thing is...
and seeing how shes so cute and all, its only right that she have adorable little accessories as well. Now im not your “throw a sweater on her and carry her around the mall in my juicy jumpsuit” kinda gal, but i think every dog could use a cute little bandana! its sporty, comfortable, you can dress it up- or dress it down... (ok im getting carried away...)
But anyways, I was up to my usual crafty business when I thought, “Geeze.. you always have so many little scrap pieces of fabric Sarah ,what should we do with all of them?...hmmm what small thing could be decorated with such a small piece of fabric?...
Lightbulb! A small pet!
ergo: Doggy Bandana!
Below is the (SUPER EASY) DIY instructions on how to make your little four-legger fashion-forward!
Step 1:
Pick out your fabric and cut it into a square. What size square you ask? well... i think the bandana should cover about 2/3 of your pets neck, so measure Fluffy’s neck, then figure out 2/3 of that (this is middle school math here peeps...), Then add about an inch to compensate for when you hem the sides under...
soo... to demonstrate....
Fluffy’s neck is 9’’ around....
2/3 of that is 6’’...
plus the 1 inch for the hem...
that means you’ll be cutting a 7x7 inch square! voila!

Step 2.
Turn edge under abut 1/2 inch and hem so you have a nice seam. Repeat for all 4 sides.

Step 3:
Fold the square in half into a triangle and sew up the side open sides starting at the corner opposite the fold.
 Now don’t sew the whole side up... what I did, and found is an awesome little trick to making the bandanas last, is leave a hole big enough for my dogs collar to fit through.
 That way, you just slide the collar through the bandana, there’s no need to fashion a strap or tie, and its free to move without getting tangled up on the collar!
Step 4:
Slip your collar though! now if you use a leash that attaches to your collar, you can cut a small hole in the top layer of the bandana where the ring for the leash is the stitch the edges (like a button hole).. This way the bandana will stay in place and you can still use the leash!

Now that you’re done- DECORATE!
I used some leftover rhinestones from another project and glued then on to make a “G” (for Gadget...)
Here are some other ideas that are sure to make your tail wag! Enjoy!
Lightbulb! A small pet!
ergo: Doggy Bandana!
Below is the (SUPER EASY) DIY instructions on how to make your little four-legger fashion-forward!
Step 1:
Pick out your fabric and cut it into a square. What size square you ask? well... i think the bandana should cover about 2/3 of your pets neck, so measure Fluffy’s neck, then figure out 2/3 of that (this is middle school math here peeps...), Then add about an inch to compensate for when you hem the sides under...
soo... to demonstrate....
Fluffy’s neck is 9’’ around....
2/3 of that is 6’’...
plus the 1 inch for the hem...
that means you’ll be cutting a 7x7 inch square! voila!
Step 2.
Turn edge under abut 1/2 inch and hem so you have a nice seam. Repeat for all 4 sides.
Step 3:
Fold the square in half into a triangle and sew up the side open sides starting at the corner opposite the fold.
Now don’t sew the whole side up... what I did, and found is an awesome little trick to making the bandanas last, is leave a hole big enough for my dogs collar to fit through.That way, you just slide the collar through the bandana, there’s no need to fashion a strap or tie, and its free to move without getting tangled up on the collar!Step 4:
Slip your collar though! now if you use a leash that attaches to your collar, you can cut a small hole in the top layer of the bandana where the ring for the leash is the stitch the edges (like a button hole).. This way the bandana will stay in place and you can still use the leash!
Now that you’re done- DECORATE!
I used some leftover rhinestones from another project and glued then on to make a “G” (for Gadget...)
Here are some other ideas that are sure to make your tail wag! Enjoy!
~Sarah


**FOLLOW UP: Heres a photo of Gadget (a little camera shy..) rockin her new bandana!!
More adorable photos to come...

Making Something out of Nothing- Pillows out of Place Mats!
Pillows have this amazing way of pulling a room together. They're great at adding a pop of color without being overwhelming,...

they soften the room, they allow you to mix textures and patterns..

basically... they're a great (and SUPER easy) way to polish off any bedroom
(or office... or living room... or guest room... or bathr-- uh, well... you get the point).
Today I was strolling through Target's dollar section (or whatever its called--- the place at the front with all the baskets of goodie
s ), and I came across some place mats for $2.50*... now- i dont have a dining room table, and have no need for place mats, but they just so happen to be the exact colors I've chosen as accents for my bedroom. (tune in for the Great Bedroom Makeover for under $150!!)
(*side note: Target has SO much kick-ass stuff right now its ridiculous! Follow-up Target review blog post coming soon!)
Sooo.... I after some examination- I discovered the place mats were double sided.... and rectangular...
"DUH!"- you say... but you know what else is double sided and rectangular? Pillow cases! these place mats were soft enough to use as pillow cases and already perfectly hemmed and sewn ... all I needed to do was add some stuffing- sew 'er up- and add 'er to the bed ensemble!
And lets not forget- those are $2.50 place mats! plus all i did was use an old throw pillow that was all flattened out and dirty (and i didnt have to go out and buy) . That brings our grand total for this project to ........
$2.50!!! (well. plus tax...)
And they wanna charge you $25.oo at pottery barn... BAH!
Below is the (SUPER EASY) DIY guide to making place mats into pillows! I encourage you to take a walk down the place mat isle next time your in a department store... and think---could I use any new throw pillows??
Step 1:
Find yo-self a place mat! Make sure you can feel both layers of fabric (and make sure they're separated!... wont really work if the two sides are fused together!) Then, grab an old throw pillow- or buy some stuffing... or buy a new pillow! Big Lots (another one of my favorite markdown stores) sells cheap-ass ones for about 3.99. Since you're not sleeping on these, who cares if theyre firm and not extra firm! 
Step 2:
Tear open that old pillow and pull out the stuffing. Old stuffing will (more often than not) be flattened out and matted looking.... but by simply pulling at it and tearing it up (pull at it like an accordion... you'll get that analogy when your holding the stuffing.) you can fluff it up and make it look (almost) new! 
Step 3:
Make a 3-4 inch opening by ripping the seam on the side of the place mat. Be gentle when doing this! Remember- this is the side of the pillow people are going to see! Then stuff the hole with the stuffing from the old pillow. I like a well-filled pillow... but that parts up to you!...
Step 4.
With either a sewing machine or by hand, stitch the place mat -- now pillow case--- back up!
Its easy when you just follow the marks left by the stitching that you ripped out in step 3.. you're basically just resealing it...
And thats it! Look at that! Something out of (almost)nothing!!
and just cause were on the topic of pillows-- i'll leave you with this.. A ginormous pillow fight.. that i just so happened to be in on Valentine's Day in San Francisco a few years ago....
Wednesday, October 14, 2009
I've been bitten! Vampire Cupcakes
I LOVE HALLOWEEN! decorating the house, dressing up ... here was me as mary katherine gallagher from SNL's Superstar circa 2005... that was the best (may be duplicating it this year.. still not sure..)

anyways... what else i love about halloween?? Well the adorable treats and food you can make! thats what! like vampire bitten cupcakes!-also perfect for your trueblood parties- (dont you dare even mention a twilight party.. that movie is awful...)

heres the recipe- as well as a few tricks to making em just perfect! (i'll alway include any lesson i lean "the hard way" on here.. so YOU dont have to!!)
2 cups cake flour
1 1/3 cups sugar
1 tsp baking powder
1/2 tsp baking soda
1/2 tsp salt
1/2 cup butter, room temperature
2 large egg whites
1 cup buttermilk
1 tsp vanilla extract
1/4 tsp almond extract
Preheat oven to 350F. Line muffin tins (you will need 18 cups total) with paper liners and set aside.
Sift together cake flour, baking powder, baking soda and salt into the bowl of an electric mixer. Add sugar and blend, using the paddle attachment (You can use a hand mixer, too).
Cut butter into 4 or 5 chunks and drop into the bowl with the flour mixture.
In a large measuring cup, combine eggs, buttermilk, vanilla and almond extracts.
Divide evenly into prepared muffin tins, filling 18 cups as equally as possible.
Bake for 16-20 minutes, until cupcakes are light golden and a toothpick inserted into their centers comes out clean. The cake should spring back when lightly pressed.
Makes 18 cupcakes.
Filling
1 can cherry pie filling
Puree cherry pie filling - (or dont... ive done both.. both taste the same.. look just as good...)
Take a cooled cupcake and, using a small pairing knife, cut a cone of cake (1-inch across by 1-inch deep) out of the top.
Take the cherry filling and spoon about tablespoon or so into each cupcake cavity,** filling it almost to the top with filling. Top off with the flat circle of cake you just removed to seal the hole and hold the “blood” filling in place.
**learned it the hard way lesson**remember not to fill too high! the top takes up room... (yay for fluid mechanics and the laws of displacement!) If the filling is coming out of the top, it will turn your frosting pink and get all kinds of in the way when the time comes to frost these bad boys.
Cream Cheese Frosting
(I like cream cheese with this-gives it a cherry cheesecake taste when its done! but any white frosting will do!)
With an electric mixer, mix the butter and cream cheese together, about 3 minutes on medium speed until very smooth. Scrape down the sides and bottom of the bowl to ensure even mixing. Add the vanilla extract and mix. Slowly add the powdered sugar. Keep adding until you get to desired sweetness.
**Learned it the hard way lesson** This is the trick!! dont start with the sides... do big glop on top!
Dip a wooden toothpick or skewer into some leftover cherry pie filling and poke two fang-holes, about 3/4 inch apart, in the frosting on one side of the cupcake. Dribble a little extra filling from the holes for effect.
Repeat until all cupcakes are frosted and decorated.
Fang-you very much ! muaahahahaha
Enjoy and Happy (almost) Halloween!!!
Subscribe to:
Posts (Atom)